
Search Manual
Band-in-a-Box® 2018 for Windows® Upgrade Manual
Chapter 3: Introduction to Band-in-a-Box 2018
Let’s take a closer look at the great new features in Band-in-a-Box 2018!
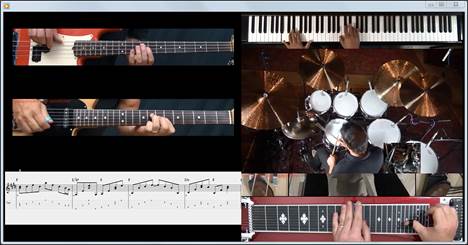
Video RealTracks
The video RealTracks is a brand new feature to Band-in-a-Box. We have 2,500 available audio RealTracks, and now we have 40 available video RealTracks including two full video bands - Country and Pop Ballad. When you load a video RealTrack, you can use it just like an audio RealTracks, but you can also generate a video, which will display the musician playing your song exactly as you hear it. If you load one of the video RealTracks bands, you will have video RealTracks on 5 tracks, and you can make a video of 1-5 musicians. You can also include a chord sheet or notation in the video.
You can easily find the video RealTracks in the RealTracks or RealDrums Picker. The “Set” column will show “VideoFound” if the video RealTracks is installed.


When you select video RealTracks, [V] will show at the track buttons.
![]()
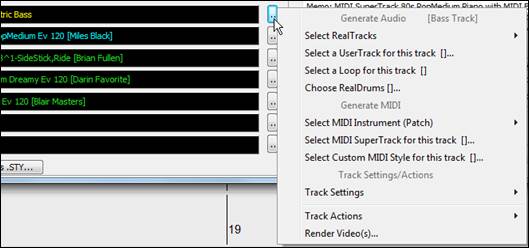
To make a video, click on the [Video] toolbar button and select Render Video(s) from the menu. |
This will open the Generate Video dialog.
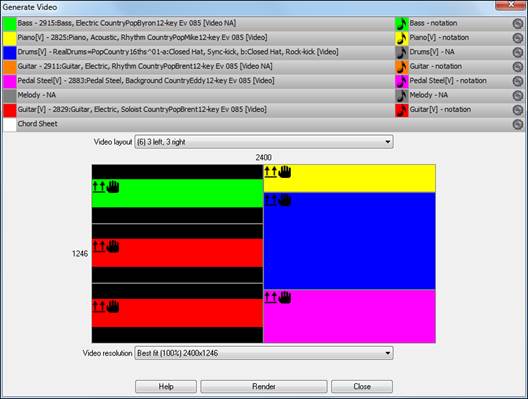
Drag one of the available tracks listed at the top of the dialog and drop it onto the layout selector below. You can also drag and drop the chord sheet or notation (if available). You can even drag a video file (.mp4 files and some .avi files) from Windows Explorer and drop it onto the video layout selector.
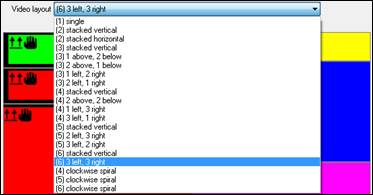
If you are making a video of multiple tracks, you can choose a track layout. For example, you can stack 3 tracks vertically for a 3-track video, or 3 tracks on the left and 2 tracks on the right for a 5-track video.
|
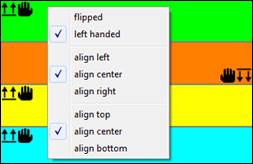
Right-clicking on the layout selector will show you a menu with options to flip a video, make a video for the left handed, or select alignment for each video. |
|||
|
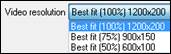
You can select the resolution for the video. The aspect ratio is determined by which tracks are included and how they are arranged, but this allows you to make the final video smaller if you want. |
|||
|
When you are ready, press this button and select the name and location for the video. |
|||
|
While the video is being rendered, you can close the dialog and use other features in Band-in-a-Box. |
|||
|
When the video has been rendered, you can click on the .mp4 file on the Windows Explorer to play the video. |
|||
Here is an example of a video for a modern country band (electric bass, electric guitar, piano, drums, and pedal steel).
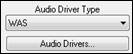
Windows Audio Session (WAS)
Band-in-a-Box now supports Windows Audio Session audio driver, an alternative to ASIO (a driver with low latency, but usually can be used by one program at a time) or MME (an older driver with worse latency). The Windows Audio Session driver has ultra-low latency (< 25 ms on a typical Windows PC), so audio operations like playing or sending out information via MIDI happen with no noticeable delay.
When you boot up Band-in-a-Box, it will be already set to use this driver without any action from you, but if you want to change the settings, go to the menu Options | MIDI/Audio Driver Setup and press the [Audio Settings [WAS]] button.
|
|
||
|
When the Audio Settings dialog opens, click on the [Audio Drivers] button. This will open the Windows Audio Devices dialog. |
||
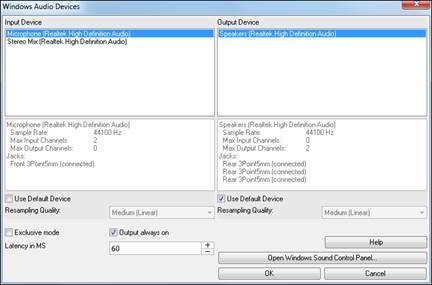
Input Device
This is the audio input device that will be used for recording a voice or an instrument. If you have multiple devices installed in your system, you can choose a device from the list.
Output Device
This is the audio output device that will be used for playing sound. If you have multiple devices installed in your system, you can choose a device from the list.
Use Default Device
When this option is enabled, the playback or recording device selected as the default device in your Windows Sound Control Panel will be used.
Exclusive mode
Use the exclusive mode if you want Band-in-a-Box to take full control over the audio device(s). In this mode, other applications might not be able to use the audio devices, so we recommend you do not use this mode.
Output always on
If this is enabled, sound will always be sent to the device. If this is disabled, sound will be sent to the device only when the song is playing. Enable this option if you want MIDI plugins to work when the song is not playing.
Resampling Quality
You can choose a quality level for resampling. “Low” will improve performance if necessary, but “High” will sound best.
[Open Windows Sound Control Panel]
This button will open the Windows Sound Control Panel. You can change your device settings by clicking on [Properties] > [Advanced]. For the “Default Format,” a setting of 16 bit, 44100 Hz is best for Band-in-a-Box.
Built-in Audio Chord Wizard
The Audio Chord Wizard has been redesigned and is now built into Band-in-a-Box. Previously, the Audio Chord Wizard was a separate app and not tightly integrated into Band-in-a-Box. This app is still available from the [Audio Chord Wizard] toolbar button, but the improved built-in Audio Chord Wizard can be accessed from the Audio Edit window.
First, open an audio file with the Open Audio menu item in the [Open] button.
![]()
![]()
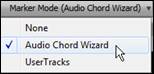
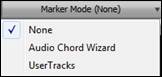
Next, go to the main menu Audio and select Audio Chord Wizard (Audio Edit). This will open the Audio Edit window with the Audio Chord Window marker mode selected.
![]()
![]()
Alternatively, you can press the [Audio Edit] button, and when the Audio Edit window opens, press the [Marker Mode] button on its toolbar and select Audio Chord Wizard from the menu.
|
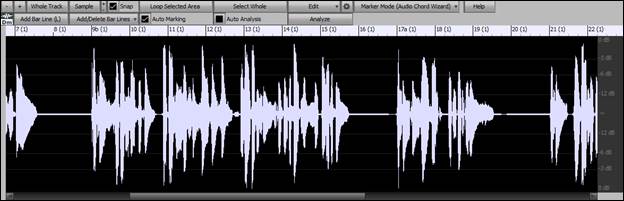
The first task is to locate bar lines in the audio so that the Audio Chord Wizard can detect chords accurately and the audio will play in sync with the Band-in-a-Box song.
![]() You can add bar lines with the [Add Bar Line] button or with the [L] key on your keyboard. A bar line will be placed at the audio edit cursor or at the playback cursor if the song is currently playing.
You can add bar lines with the [Add Bar Line] button or with the [L] key on your keyboard. A bar line will be placed at the audio edit cursor or at the playback cursor if the song is currently playing.
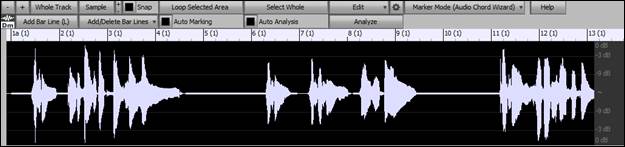
![]() The [Add/Delete Bar Lines] button menu has options to add bar lines based on your song structure or tempo. You can delete all the existing bar lines or only the ones within the highlighted region.
The [Add/Delete Bar Lines] button menu has options to add bar lines based on your song structure or tempo. You can delete all the existing bar lines or only the ones within the highlighted region.
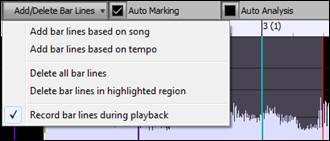
![]() If “Auto Marking” is enabled, then Band-in-a-Box will automatically add and arrange bar lines based on the bar lines you have added manually. The “auto” bar lines will show in light blue, and the “user” bar lines will show in purple. You can change these colors in the Audio Edit Settings dialog if you want.
If “Auto Marking” is enabled, then Band-in-a-Box will automatically add and arrange bar lines based on the bar lines you have added manually. The “auto” bar lines will show in light blue, and the “user” bar lines will show in purple. You can change these colors in the Audio Edit Settings dialog if you want.
![]() If “Auto Analysis” is enabled, then Band-in-a-Box will re-analyze the chords in the audio whenever you add or move a bar line, or when you edit the audio data. Keep this setting disabled if you prefer to set all bar lines first (i.e. establishing tempo), and then analyze the chords when you are done.
If “Auto Analysis” is enabled, then Band-in-a-Box will re-analyze the chords in the audio whenever you add or move a bar line, or when you edit the audio data. Keep this setting disabled if you prefer to set all bar lines first (i.e. establishing tempo), and then analyze the chords when you are done.
Bar lines can be moved with the mouse. Just click and drag the thumb control at the bottom. If you move an “auto” bar line, it will become a “user” bar line.
 |
You can also right-click on the thumb control to get a context menu with options to switch a marker type (“user” or “auto”), delete the bar line, or set the time signature for the bar. The menu also shows you the tempo of the bar, based on the time signature of the bar and the position of the next bar line. |
When you add or move bar lines, Band-in-a-Box will automatically make a tempo map, so your song will play in sync with the audio.
Any changes you make in the Audio Chord Wizard mode are undo-able. This was previously not possible with the stand-alone Audio Chord Wizard.
![]() Use the [Analyze] button to analyze the chords in the audio. The chords detected in the audio will be written into the Chord Sheet. You don’t need to do this if you have “Auto Analysis” enabled, but you might want to if you have erased or made changes to the chords in the Chord Sheet.
Use the [Analyze] button to analyze the chords in the audio. The chords detected in the audio will be written into the Chord Sheet. You don’t need to do this if you have “Auto Analysis” enabled, but you might want to if you have erased or made changes to the chords in the Chord Sheet.
When you open the Chord Sheet, you will see that the Audio Chord Wizard has entered the chords and the tempo map.

Audio Harmonies Feature Enhancements
Harmonize the Audio track with up to 4 voices with the new Audio Harmony dialog
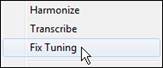
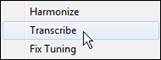
To access this feature, first open an audio file (WAV/WMA/MP3/M4A) or a Band-in-a-Box song file with audio. Then, go to the menu Audio or Harmony, and select Audio Harmonies, Pitch Tracking, Fix Tuning (Audio Edit).
![]() or
or ![]()
![]()
This will open the Audio Edit window and the new Audio Harmony dialog.
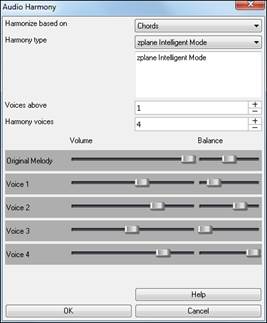
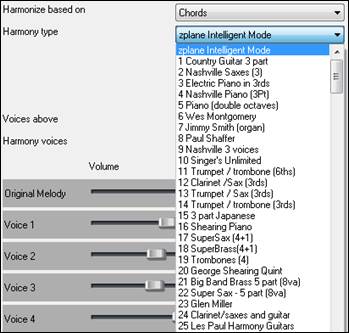
Choose one of the 4 harmonizing modes.

1) The “Chords” mode will harmonize the audio based on the chords in your song. Choose a type of harmony from the “Harmony type” option. Choose either the intelligent mode, which allows you to select the number of voices, or one of the Band-in-a-Box harmony presets. You can also select the volume and the stereo balance of each voice in the harmony.
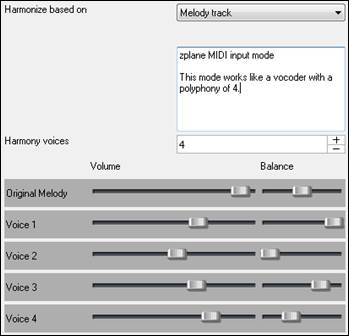
2) The “Melody track” mode will add voices to the audio, based on melodies in the Melody track. You can choose the number of voices (up to 4 voices), and the volume and the stereo balance of each voice.
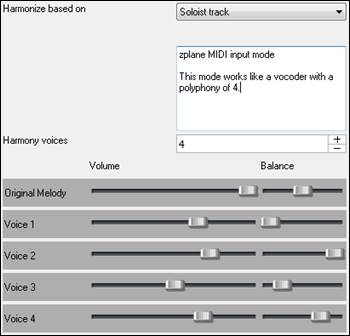
3) The “Soloist track” mode will add voices to the audio, based on melodies in the Soloist track. You can choose the number of voices (up to 4 voices), and the volume and the stereo balance of each voice.
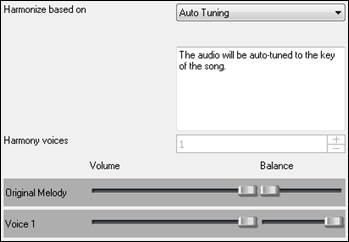
4) The “Fix Tuning” mode will analyze the Audio track and correct out-of-tune notes in the selected region according to the key of your song. Normally, you do not want to keep out-of-tune notes after the fix tuning is done, but you can mix the original voice with the fixed one by moving the volume slider for “Original Melody” to the right.
Fix Tuning for Audio track
This feature analyzes the Audio track and correct out-of-tune notes in the selected region according to the key of your song. For example, in the key of C, if a C# is detected, then it will be transposed down to C or up to D depending on which one is closer. To use this feature, press the [Edit] button in the Audio Edit window and select Fix Tuning from the menu.
![]()
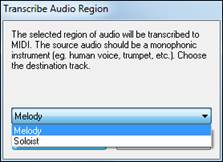
Auto-Transcribe of Audio track to notation (MIDI)
This will transcribe the audio data to the Melody or Soloist track as MIDI data.
To access this feature, press the [Edit] button in the Audio Edit window and select Transcribe from the menu. You can then select the destination track.
 |
|
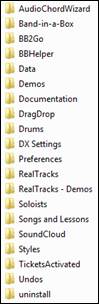
Cleaned-up BB Folder
The Band-in-a-Box folder (usually C:\bb) has become full of lots of files over the years. Up to 10,000 files are present in the folder on a full install of the UltraPAK. With version 2018, we have fixed this and put the files into various folders. This is done with a cleanup routine. The cleanup normally happens automatically during installation, but you can run it manually by selecting the main menu Help | Utilities | Run Cleanup routine.
![]()
|
Technical note: This will run a utility C:\bb\Data\BB_cleanup.exe, which you can double-click on it to run outside of the Band-in-a-Box program.
The cleanup routine does the following. |
|
Save Notation Window as a Video
With previous versions of Band-in-a-Box, you could make a video of the Chord Sheet, showing the highlighted bars as the song is playing. Now, you can make a video of the Notation window. This is helpful if you have a melody or a RealChart (notation for RealTracks) that you would like to see on a video.
To make a video of the Notation window, press the [Save As] button and select Save as Video from the menu.
![]()
![]()
In the Make Notation Video dialog, select a track at the upper left corner. (Note: The dialog title says “Make Chord Sheet Video” until you select a track.)
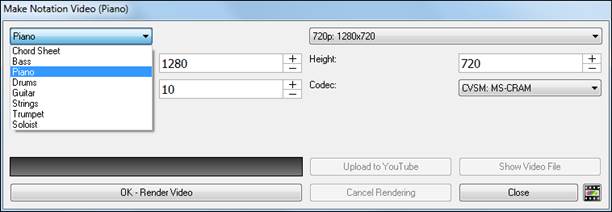
You can also set the dimension (width/height) of the video, and select the number of frames per second and a specific codec.
Press the [OK - Render Video] button to start rendering the video.
Improved GUI
The Toolbar has been with skins support. Previously, the smaller toolbar buttons were black and white, but now there are various skin options for the buttons.
![]()
To choose a skin, open the Display Options dialog by clicking on the Chord Sheet and selecting the Display Options menu item, and press the [Choose Skin] button.
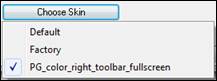 |
Technical Note: To examine or create your own skins, look in the C:\bb\Data\CustomSkins folder. |
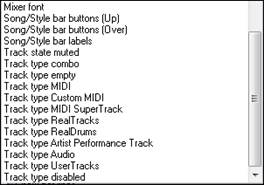
The Display Options dialog has more customizable color items: Mixer font, Song/Style bar buttons (Up), Song/Style bar buttons (Over), Song/Style bar labels, Track state muted, Track type combo, Track type empty, Track type MIDI, Track type Custom MIDI, Track type MIDI SuperTrack, Track type RealTracks, Track type RealDrums, Track type Artist Performance Track, Track type Audio, Track type UserTracks, and Track type disabled.
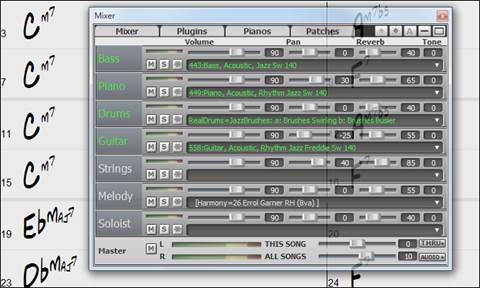
Improved Mixer
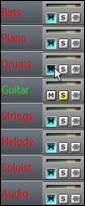
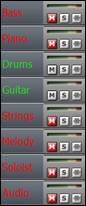
Soloing/Muting functions are improved.
Now you can change the solo and the mute status of other tracks by right-clicking on a blue mute button.
 |
→ |
|
For example, if the Guitar track is in the solo status, when you right-click on the blue mute button on the Drums track, the Drums track will be un-muted AND the Guitar track will be un-soloed. |
The floating Mixer window now has opacity controls.
![]() Left-click on the buttons at the top right to change the opacity by a significant amount, or right-click on them to change it by a small amount.
Left-click on the buttons at the top right to change the opacity by a significant amount, or right-click on them to change it by a small amount.
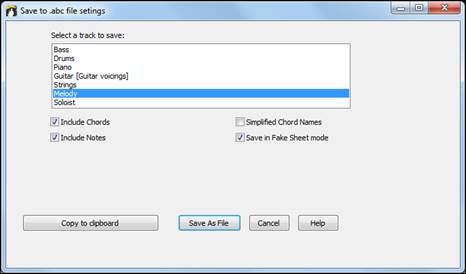
Support for ABC Notation Format
ABC notation is the simple text-based notation system used by musicians worldwide to store chords, melody, and lyrics of songs. Now you can open and save songs in ABC notation format. You can find out more information about the songs and ABC notation at abcnotation.com.
To save the song in ABC notation format, press the [Save As] toolbar button and choose Save as ABC notation file from the menu.
![]()
![]()
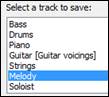 |
Select a track that you want to save in the file. |
![]()
Enable “Include Chords” to save chords in the file.
When “Include Notes” is checked, notes on the selected track will be saved.
When “Simplified Chord Names” is enabled, complicated chords will be written as simplified names. For example, D7#5#9 will be written as D7.
Enable the “Save in Fake Sheet mode” option if you want to save repeats and endings in the file.
![]()
The [Copy to clipboard] button will copy the file to the clipboard. You can then paste it into other programs. The [Save as File] button will let you type a name and select the destination in your hard drive.
You can open an ABC notation file with the [Open] toolbar button.
![]() .
.![]()
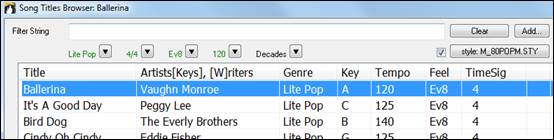
Song Titles Brower Enhancements
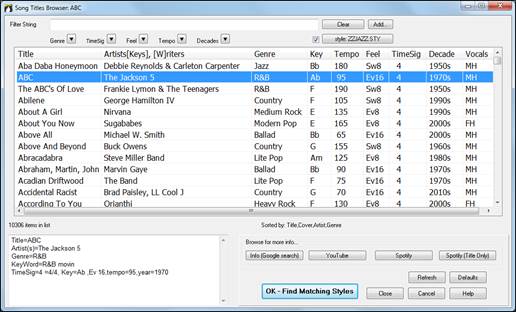
We’ve added 2,000 new song titles including requests from users, so there are now over 10,000 songs!
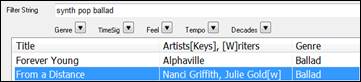
You can now filter the list by genres, time signature, feel, tempo, and decades.
![]()
The dialog can list song titles that will work with the current style.
![]()
Press the [style: ] button to filter the list by the genre, time signature, feel, and tempo of the current style. If the checkbox to the left of this button is enabled, then when you open the dialog, the list will be automatically filtered to show song titles that are similar to the current style.
Subgenres have been added for most song titles. Searching by a subgenre name in the text filter will display song titles in that subgenre.
Recommendation of styles has been improved. When you select a song title and press the [OK - Find Matching Styles] button, the StylePicker dialog will open and show only styles that will work with that song title. This feature has been improved so that subgenres are also considered, so the style recommendations are more accurate.
StylePicker Enhancements
Mixer-like control shows what tracks and instruments are used in the currently selected style in the list, and color-codes them according to the track types (MIDI, MIDI SuperTracks, or RealTracks).
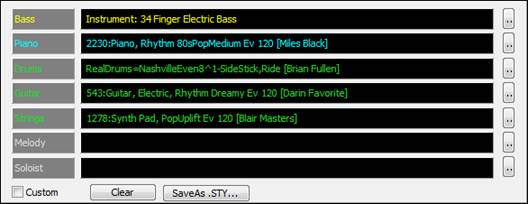
For each track, there is a menu button, which allows you to change the instrument, disable/enable the track, or perform other track actions. Previously, you had to close to the StylePicker window to do these.
When the track is customized, an asterisk will be added to the name.

When the “Custom” option is checked, the tracks of the currently selected style will be overridden with the choices you have made.
The [Clear] button will clear any customized settings.
Press the [Save as .STY] button to save the style that you have customized. When you save the style, it will be added to the StylePicker list.
Recommendation of styles is improved when using the [Find Titles] button at the top right of the dialog. This also displays subgenres and makes it easier to find styles for a certain popular song.
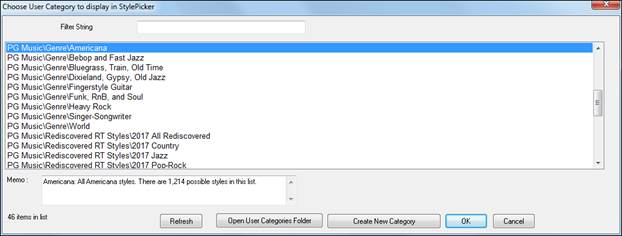
New user categories have been added, including Americana; Bebop and Fast Jazz; Bluegrass, Train, and Old Time; Dixieland, Gypsy, and Old Jazz; Fingerstyle Guitar; Funk, RnB, and Soul; Heavy Rock; Singer-Songwriter; and World.
The buttons to copy the styles list to the clipboard, set the dialog options, and reset the dialog to defaults have been moved to the [Action] button menu.

The buttons to rebuild a complete or partial styles list have been combined into a single button.
![]()
Rebuilding the styles list also rebuilds lists in the RealTracks and RealDrums Picker dialogs.
The option to change the font size of the text in the styles list has been moved to the StylePicker Options dialog.
![]()
![]()
Renewed Render to Audio File Dialog
The dialog now has a simpler look and is easier to use.
You can open the dialog by selecting the Export Song as Audio File menu item from the [.WAV] toolbar button. |
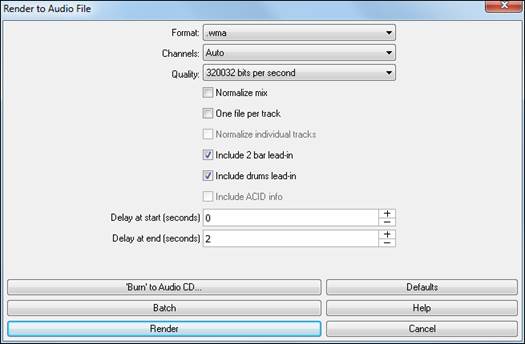
Format
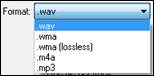 |
Select the format of the audio file: WAV, WMA, WMA (lossless), M4A, or MP3.
Note: If you are using Windows XP or Vista, the M4A option requires Apple® QuickTime® Library for Windows®, available from www.apple.com.
|
Channels
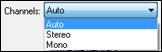 |
When “Auto” is selected, individual tracks will be rendered as either mono or stereo, depending on the original source. You can also force to render all tracks as stereo or mono. |
Quality
The bit rate selection is available for compressed audio files (WMA, M4A, and MP3). |
Normalize mix
Enable this option if you want the audio file normalized. Normalizing boosts the volume to a maximum level without distortion, but it takes longer to render.
One file per track
If this option is enabled, you will get separate audio files, one for each track.
Normalize individual tracks
Enable this option if you want each track normalized individually. This applies if the “One file per track” option is enabled or when you drag and drop an individual track out of Band-in-a-Box.
Include 2 bar lead-in
If this option is disabled and there is no lead-in in the Melody track, the lead-in will be skipped in the rendered file.
Include drums lead-in
Enable this if you want to include the drum count-in the rendered file.
Include ACID info
If you are rendering to a WAV audio file, you can include ACID information such as tempo, key, and time signature. The ACID information can be read by many DAW programs.
Delay at start (seconds)
This allows you to add silence in seconds at the start of the audio file.
Delay at end (seconds)
You can also add silence in seconds at the end of the audio file.
[Burn to Audio CD]
This button will open the MiniBurn program, which allows you to burn your own CD.
[Batch]
This button allows you to render all songs in a folder to audio files.
[Render]
To render the song, press this button and select the name and destination for the audio file.
High Resolution MP3 Audio Rendering
Band-in-a-Box will render songs to MP3 files in the highest resolution available (320 kilobits per second).

Faster M4A Audio Rendering
This uses Windows functions instead of Apple® QuickTime® Library for Windows®.
RealDrums Picker Enhancements
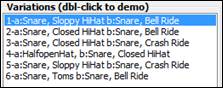
You can now demo individual variations of the RealDrums at the tempo closest to your current song by double-clicking on them.
The “#” column shows “VideoFound” if the video RealDrums is installed.

RealDrums QuickList
There is now a simpler dialog for choosing RealDrums, an alternative to the RealDrums Picker. It displays all available RealDrums in a simple list, which can be easily filtered by genre, time signature, feel, and more. The list can be set to show only RealDrums that are compatible with the current style of the song. You can also set the highlighted RealDrums as a prototype RealDrums to find alternates to that RealDrums.
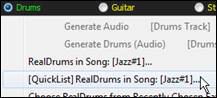 |
To open the dialog, right-click on the Drums track button, and select [QuickList] RealDrums in Song from the menu. |
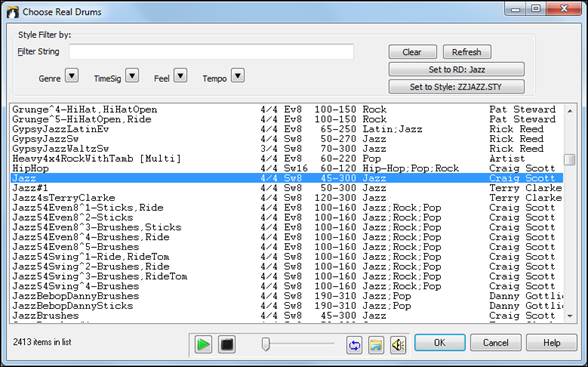
You can filter the list by genre, time signature, feel, tempo, and text. Press the [Set to Style: ] button to see RealDrums that are compatible with the current style of the song. The [Set to RD: ] button will set the highlighted RealDrums as a prototype RealDrums so you can find alternates to that RealDrums. Press the [Clear] button to clear any filter.

Audio Edit Window Enhancements
The Audio Edit window now has a nicer looking GUI, with a dedicated settings button and a Marker Mode button.
![]()
 |
When you select the Audio Chord Wizard or UserTracks mode, the markers will be visible and editable. |
Editing features can now apply to the entire track. Before version 2018, you had to highlight a region to use editing features, but now if no region is highlighted, then they will apply to the entire track.
There are some items added to the [Edit] button menu.
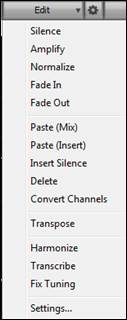 |
Paste (Mix) - This will mix the audio from the clipboard with the existing audio instead of overwriting it. You will be given the option to set the percentage of the existing audio to keep and the pasted audio to mix in. |
Guitar Window Enhancements
Clicking on the black area to the left of the zero fret notes in the Guitar window will delete the notes on just the channel of that string on the current notation time line rather than all notes at that time line.
Clicking on a note will delete the note from the Notation window if the note is currently highlighted. If no notes are highlighted in red, then clicking on a note will first delete any notes on the current notation timeline and channel before inserting a new note.
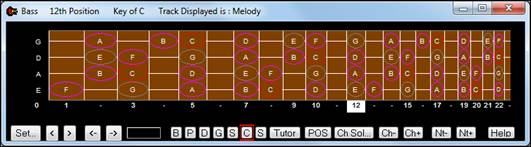
Big Piano Window Enhancements
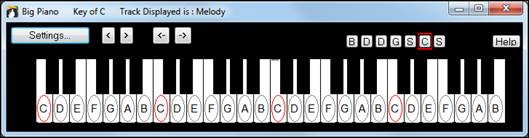
Clicking on the black area to the left of the piano will delete highlighted red notes from the Notation window. If no notes are highlighted in red, then clicking to the left of the piano will delete any note on the current notation timeline.
Clicking on a note will delete the note from the Notation window if the note is currently highlighted in red.
Notation Window Enhancements
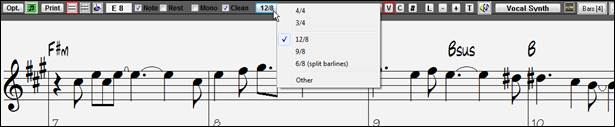
Notation supports 12/8, 9/8, and 6/8 time signatures. Previous versions of Band-in-a-Box only supported 3/4 or 4/4 notation. Now you can also select 12/8, 9/8, or 6/8. This is done by pressing the new button in the Notation window and selecting one of the time signatures from the list.
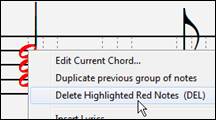
Duplicate previous group of notes lets you quickly duplicate the previous chord (a group of notes on the same location) without having to reenter it. This is a menu option added to the context menu in the Notation window.

Delete highlighted Red Notes lets you delete all notes that are currently highlighted in red. This command is also added to the context menu in the Notation window.
The Staff Roll mode now has a context menu.
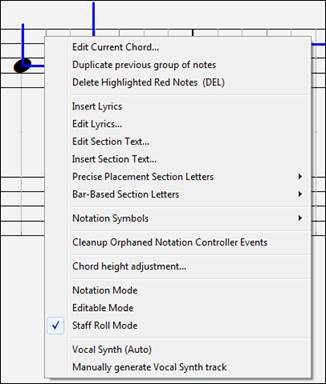
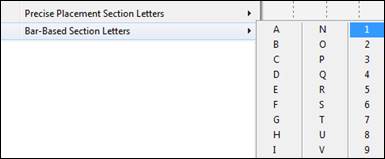
You can now enter Section Numbers. Previously, you could enter letters (A-Z) only, but now you can also enter numbers (1-9).
The vertical position of a dot of a dotted rest has been adjusted. A dot used to be drawn a staff line, but it is now drawn between staff lines.
Old version: |
New version: |

When loading a MusicXML file, if more than 20% of notes are triplet notes, then the overall beat resolution will be automatically set to 3 in the Notation window.

Improved algorithms are now used for drawing slurs. A slur will be drawn with a Bezier curve, which is especially helpful for notes being very close together.
Flash Messages
Flash messages are now brighter for clarity.
They also have a close button, which is useful for closing green flash messages without performing the action.
Up to 4 messages can be on the screen at once. Previously, only 2 messages could be shown.
And more!
Thank you for taking the time to read this introduction to Band-in-a-Box 2018!
Unconditional 30-Day Money Back Guarantee on all PG Music products purchased from PG Music Inc.
PG Music Inc.
29 Cadillac Ave Victoria BC Canada V8Z 1T3
Sales: 800-268-6272, 250-475-2874,+ 800-4746-8742*
* Outside USA & Canada where International Freephone service is available.
Access Codes
Tech Support: Live Chat, support@pgmusic.com
 Online now
Need Help?
Customer Sales & Support
|
Phones (Pacific Time) 1-800-268-6272 1-250-475-2874 |
||
| Live Chat | ||
| OPEN | Online Ordering 24/7 |
|
| OPEN | Forums, email, web support |